上一篇博客从源码层面解释了appium-inspector工具实现原理,这篇博客将介绍如何从0构建一款简单的类似appium-inspector的工具。如果要实现一款类似appium-inspector的demo工具,大致需要完成如下六个模块内容
- 启动 Appium 服务器
- 连接到移动设备或模拟器
- 启动应用并获取页面源代码
- 解析页面源代码
- 展示 UI 元素
- 生成 Locator
启动appium服务
安装appium,因为要启动android的模拟器,后续需要连接到appium server上,所以这里还需要安装driver,这里需要安装uiautomater2的driver。
npm install -g appium
appium -v
appium

//安装driver
appium driver install uiautomator2
appium driver list

//启动appium服务
appium成功启动appium服务后,该服务默认监听在4723端口上,启动结果如下图所示

连接到移动设备或模拟器
在编写代码连接到移动设备前,需要安装android以及一些SDK,然后通过Android studio启动一个android的手机模拟器,这部分内容这里不再详细展开,启动模拟器后,再编写代码让client端连接下appium服务端。
下面代码通过调用webdriverio这个lib中提供remote对象来连接到appium服务器上。另外,下面的代码中还封装了ensureClient()方法,连接appium服务后,会有一个session,这个sessionId超时后会过期,所以,这里增加ensureClient()方法来判断是否需要client端重新连接appium,获取新的sessionId信息。
import { remote } from 'webdriverio';
import fs from 'fs';
import xml2js from 'xml2js';
import express from 'express';
import cors from 'cors';
import path from 'path';
import { fileURLToPath } from 'url';

// 获取当前文件的目录名
const __filename = fileURLToPath(import.meta.url);
const __dirname = path.dirname(__filename);
// 加载配置文件
const config = JSON.parse(fs.readFileSync('./src/config.json', 'utf-8'));
// 配置连接参数
const opts = {
    path: '/',
    port: 4723,
    capabilities: {
        'appium:platformName': config.platformName,
        'appium:platformVersion': config.platformVersion,
        'appium:deviceName': config.deviceName,
        'appium:app': config.app,
        'appium:automationName': config.automationName,
        'appium:appWaitActivity':config.appActivity
    },
};

const app = express();
app.use(cors());
app.use(express.json());
app.use(express.static(path.join(__dirname, 'public')));
let client;


const initializeAppiumClient = async () => {
    try {
        client = await remote(opts);
        console.log('Connected to Appium server');
    } catch (err) {
        console.error('Failed to connect to Appium server:', err);
    }
};
//解决session过期的问题
const ensureClient = async () => {
    if (!client) {
        await initializeAppiumClient();
    } else {
        try {
            await client.status();
        } catch (err) {
            if (err.message.includes('invalid session id')) {
                console.log('Session expired, reinitializing Appium client');
                await initializeAppiumClient();
            } else {
                throw err;
            }
        }
    }
};
启动应用并获取页面信息
当client端连接到appium server后,获取当前模拟器上应用页面信息是非常简单的,这里需要提前在模拟器上安装一个app,并开启app。代码的代码中将获取page source信息,获取screenshot信息,点击tap信息都封装成了api接口,并通过express,在9096端口上启动了一个后端服务。
app.get('/page-source', async (req, res) => {
    try {
        await ensureClient();
        // 获取页面源代码
        const pageSource = await client.getPageSource();
        const parser = new xml2js.Parser();
        const result = await parser.parseStringPromise(pageSource);
        res.json(result);
    } catch (err) {
        console.error('Error occurred:', err);
        res.status(500).send('Error occurred');
    }
});

app.get('/screenshot', async (req, res) => {
    try {
        await ensureClient();
        // 获取截图
        const screenshot = await client.takeScreenshot();
        res.send(screenshot);
    } catch (err) {
        console.error('Error occurred:', err);
        res.status(500).send('Error occurred');
    }
});

app.post('/tap', async (req, res) => {
    try {
        await ensureClient();
        const { x, y } = req.body;
        await client.touchAction({
            action: 'tap',
            x,
            y
        });
        res.send({ status: 'success', x, y });
    } catch (err) {
        console.error('Error occurred while tapping element:', err);
        res.status(500).send('Error occurred');
    }
});

app.listen(9096, async() => {
    await initializeAppiumClient();
    console.log('Appium Inspector server running at http://localhost:9096');
});

process.on('exit', async () => {
    if (client) {
        await client.deleteSession();
        console.log('Appium client session closed');
    }
});
下图就是上述服务启动后,调用接口,获取到的页面page source信息,这里把xml格式的page source转换成了json格式存储。结果如下图所示:

显示appUI以及解析获取element信息
下面的代码是使用react编写,所以,可以通过react提供的命令,先初始化一个react项目,再编写下面的代码。对于在react编写的应用上显示mobile app的ui非常简单,调用上面后端服务封装的api获取page source,使用<imag src=screenshot>就可以在web UI上显示mobile app的UI。
另外,除了显示UI外,当点击某个页面元素时,期望能获取到该元素的相关信息,这样才能结合元素信息生成locator,这里封装了findElementAtCoordinates方法来从pageSource中查找match的元素,查找的逻辑是根据坐标信息,也就是pagesource中bounds字段信息进行匹配match的。
import React, {useState, useEffect, useRef} from 'react';
import axios from 'axios';

const App = () => {
    const [pageSource, setPageSource] = useState('');
    const [screenshot, setScreenshot] = useState('');
    const [elementInfo, setElementInfo] = useState(null);
    const [highlightBounds, setHighlightBounds] = useState(null);
    const imageRef = useRef(null);
    const ERROR_MARGIN = 5; // 可以调整误差范围

    const getPageSource = async () => {
        try {
            const response = await axios.get('http://localhost:9096/page-source');
            setPageSource(response.data);
        } catch (err) {
            console.error('Error fetching page source:', err);
        }
    };
    const getScreenshot = async () => {
        try {
            const response = await axios.get('http://localhost:9096/screenshot');
            setScreenshot(`data:image/png;base64,${response.data}`);
        } catch (err) {
            console.error('Error fetching screenshot:', err);
        }
    };
    useEffect( () => {
         getPageSource();
         getScreenshot()
    }, []);

    const handleImageClick = (event) => {
        if (imageRef.current && pageSource) {
            const rect = imageRef.current.getBoundingClientRect();
            const x = event.clientX - rect.left;
            const y = event.clientY - rect.top;
            // 检索页面源数据中的元素
            pageSource.hierarchy.$.bounds="[0,0][1080,2208]";
            const element = findElementAtCoordinates(pageSource.hierarchy, x, y);
            if (element) {
                setElementInfo(element.$);
                const bounds = parseBounds(element.$.bounds);
                setHighlightBounds(bounds);
            } else {
                setElementInfo(null);
                setHighlightBounds(null);
            }
        }
    };
    const parseBounds = (boundsStr) => {
        const bounds = boundsStr.match(/\d+/g).map(Number);
        return {
            left: bounds[0],
            top: bounds[1],
            right: bounds[2],
            bottom: bounds[3],
            centerX: (bounds[0] + bounds[2]) / 2,
            centerY: (bounds[1] + bounds[3]) / 2,
        };
    };

    const findElementAtCoordinates = (node, x, y) => {
        if (!node || !node.$ || !node.$.bounds) {
            return null;
        }
        const bounds = parseBounds(node.$.bounds);

        const withinBounds = (x, y, bounds) => {
            return (
                x >= bounds.left &&
                x <= bounds.right &&
                y >= bounds.top &&
                y <= bounds.bottom
            );
        };

        if (withinBounds(x, y, bounds)) {
            for (const child of Object.values(node)) {
                if (Array.isArray(child)) {
                    for (const grandChild of child) {
                        const foundElement = findElementAtCoordinates(grandChild, x, y);
                        if (foundElement) {
                            return foundElement;
                        }
                    }
                }
            }
            return node;
        }

        return null;
    };

    return (
        <div>
            {screenshot && (
                <div style={{ position: 'relative' }}>
                    <img
                        ref={imageRef}
                        src={screenshot}
                        alt="Mobile App Screenshot"
                        onClick={handleImageClick}
                        style={{ cursor: 'pointer', width: '1080px', height: '2208px' }} // 根据 page source 调整大小
                    />
                    {highlightBounds && (
                        <div
                            style={{
                                position: 'absolute',
                                left: highlightBounds.left,
                                top: highlightBounds.top,
                                width: highlightBounds.right - highlightBounds.left,
                                height: highlightBounds.bottom - highlightBounds.top,
                                border: '2px solid red',
                                pointerEvents: 'none',
                            }}
                        />
                    )}
                </div>
            )}
            {elementInfo && (
                <div>
                    <h3>Element Info</h3>
                    <pre>{JSON.stringify(elementInfo, null, 2)}</pre>
                </div>
            )}
        </div>
    );
};

export default App;
下图图一是android模拟器上启动了一个mobile app页面。

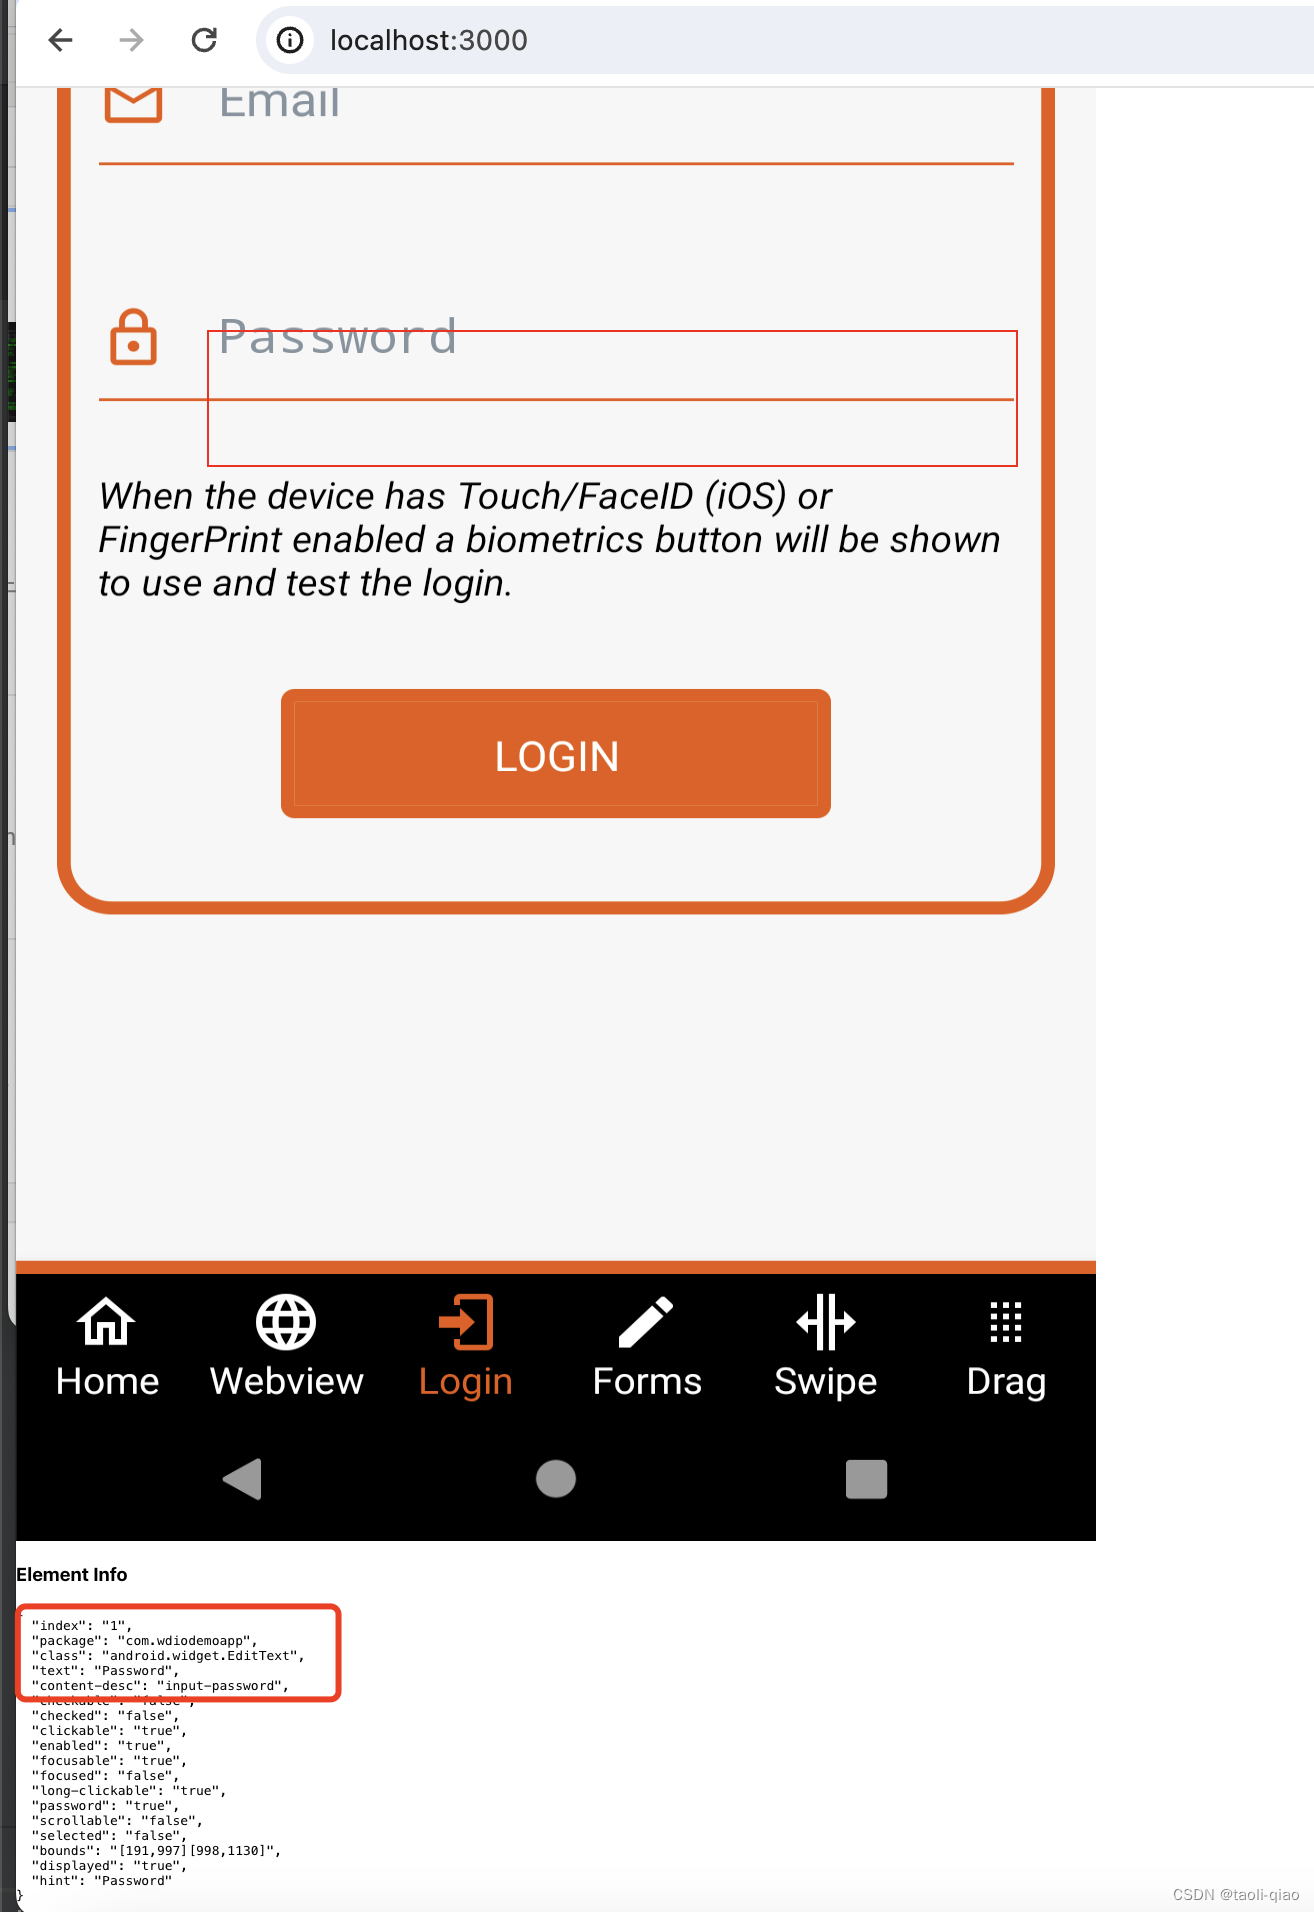
下图是启动react编写的前端应用,可以看到,在该应用上显示了模拟器上的mobile app ui,当点击某个元素时,会显示被点击元素的相关信息,说明整个逻辑已经打通。当点击password这个输入框元素时,下面显示了element info,可以看到成功查找到了对应的element。当然,这个工具只是一个显示核心过程的demo code。例如higlight的红框,不是以目标元素为中心画的。
关于生成locator部分,这里并没有提供code,当获取到element信息后,还需要获取该element的parent element,根据locator的一些规则,编写方法实现,更多的细节可以参考appium-server 源代码。
整个工具的demo code 详见这里,关于如果启动应用部分,可以看readme信息。